Stick Instructions for Installation Day

It’s totally possible and very common to install peel-and-stick wallpaper by yourself. But, the task can be quicker and easier with two humans. One person can hold the panel up and smooth onto the wall while the second person peels the backing off and ensures the lines are straight.

1. Peel Back + Line Up.
Grab Panel #1 and peel back 6-8 inches of the backing. Line up the top and side of the first panel of wallpaper with your pencil guidelines and press firmly to the surface.
- Don’t follow the ceiling. Although, it's tempting to line the top of your wallpaper with the ceiling, ceilings aren’t always perfectly straight. Instead, use the vertical and horizontal guidelines you drew earlier.
- Install with extra material overlapping onto the ceiling. IF you have enough material to allow for an inch or so to go above the top of the wall, this allows some wiggle room if your panels are not perfectly straight. Then, trim along ceiling when all panels are installed.

2. Peel + Squeegee + Repeat.
Carefully smooth down the wallpaper onto the wall from the top. As you move down the wall, press and smooth the wallpaper against the wall while peeling off the remaining backing. Using downward strokes, run a squeegee (plastic smoothing tool) along the wall to remove air bubbles as you move down the surface.
- Don't peel too much backing off at once to ensure that the wallpaper doesn’t stick to itself. It is very difficult to pull back apart (Although, it CAN be done with patience and gentleness, it is pretty frustrating.)
- Smooth/Squeegee from the center, then down and outwards to push any bubbles to the edge of the paper. This paper is forgiving, so you can gently peel it back up if you see an air pocket, then start again.
- Don’t pull the wallpaper too hard
3. Overlap + Match + Repeat.
*PLEASE NOTE: HIGH TACK material does NOT have an overlap, but lines up edge to edge.
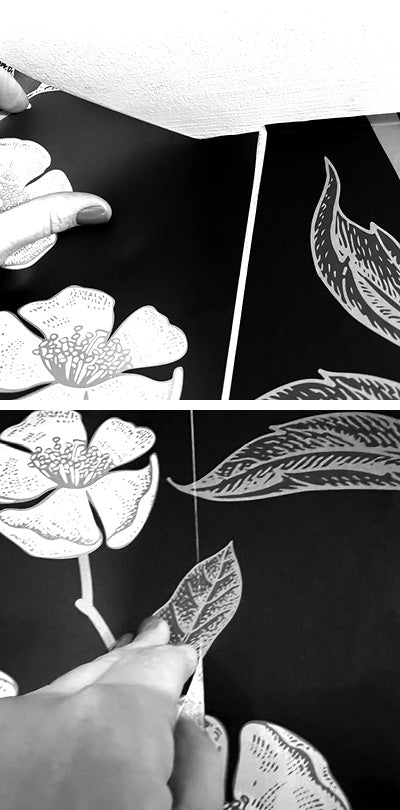
Now that the first panel is done, you got this! Grab Panel #2. Line up
the wallpaper pattern as close as possible to ensure a seamless look.
To match the pattern, you'll have to overlap Panel #2 slightly with the
long edge Panel #1 (MyWallImages allows 1/4” overlap).* After you've
smoothed the panel, run squeegee along the seam overlap to ensure it
is flat.
- How to Work Around Windows and Outlets. Allow the wallpaper to overlap any window or outlet. You may need to cut a few relief snips diagonally toward the corner/edge. Smooth the wallpaper along the wall and around all sides of the outlet or window. Trim any excess paper.
4. Trim + Smooth Edges.
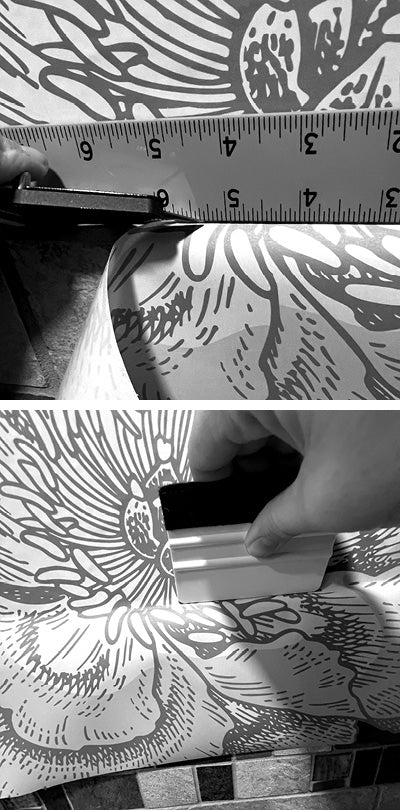
Once your wall has been covered in your amazing new wallpaper (!), use a metal ruler and utility or craft knife to carefully cut along the baseboard and remove any excess. Use your smoothing tool to ensure all the tops, bottoms, and seams of the panels are nice and tight against the wall.


5. Final Bubble Check.
If any air bubbles remain, use the tip of your knife or a pin to create a
small hole in the middle of the bubble. Simply press down to release the air trapped inside and smooth the wallpaper.

6. Add Covers + ENJOY!
Once you’ve smoothed out the wallpaper, you can start adding outlet covers back to walls and bring furniture back into the room. Enjoy your updated space


